Build Local MCP Server
Module 1: The Library Ecosystem (Why FastMCP?)
Before writing any code, you must understand the toolset. When developers first tried to build MCP servers using the raw protocol specifications, they faced two major issues: it was highly complex, and it required writing massive amounts of redundant boilerplate code for every new server.
To solve this, the ecosystem evolved in three stages:
- The Official MCP SDK: Anthropic released an official Python SDK containing
mcp.server,mcp.client, andmcp.cli. However, it was still very verbose and boilerplate-heavy. - The FastMCP Abstraction (v1): Jeremiah Lowin (CEO of Prefect) created an abstraction layer on top of the MCP SDK called FastMCP, making server creation incredibly beginner-friendly and fast. It became so popular that the official SDK adopted it as its default.
- FastMCP 2.0: Around 2025, FastMCP broke out into its own independent, highly scalable library. Today, you can install it directly as a standalone package.
The Analogy for Mastery: Think of the official MCP SDK like WSGI (the low-level specification), and FastMCP like Flask (the developer-friendly framework that everyone actually uses to build Python backends). We will exclusively use FastMCP because developer-friendly abstractions always become the industry standard.
Module 2: The Foundation & Project Setup
To build modern Python applications efficiently, we will use UV, a blazing-fast package manager that acts as an upgraded replacement for pip.
Step-by-Step Setup:
-
Install UV: Run
pip install uvin your terminal. -
Initialize Project: Create a new folder (e.g.,
ExpenseTrackerMCPServer), open it in VS Code, and initialize it by runninguv init .in the terminal. This generates amain.pyfile. -
Install FastMCP: Run
uv add fastmcp(this is the UV equivalent ofpip install).source .venv/bin/activateto activate the virtual environment. -
Verify Installation: Run
fastmcp --version&fastmcp versionto ensure you are running version 3.x.
Module 3: Building & Testing a “Demo” Server
Before building complex applications, you must master the basic server-client pipeline.
The Server Code (main.py)
Building a server with FastMCP requires merely instantiating the server and decorating standard Python functions.
from fastmcp import FastMCP

# 1. Initialize the Server
demo_server = FastMCP("Demo Server")

# 2. Turn Python functions into MCP Tools using a decorator
@demo_server.tool()
def add_numbers(a: int, b: int) -> int:
    return a + b

@demo_server.tool()
def roll_dice(count: int) -> list:
    # Logic to roll 'count' number of dice
    pass

# 3. Run the Server
if __name__ == "__main__":
    demo_server.run()
Testing with MCP Inspector
You should never test your server blindly inside a chatbot first. FastMCP comes with an
MCP Inspector—a debugging tool similar to Postman, but for MCP.
-
Command: Run
uv run fastmcp dev inspector main.py. -
Action: This opens a web interface where you can connect to your server, view the exchanged JSON-RPC messages, list your tools, and execute them manually to verify output.
Integrating with Claude Desktop
Once tested, you can install your server directly into Claude Desktop using the CLI.
- Command:
uv run fastmcp install claude-desktop main.py.
Critical Troubleshooting Step:
Sometimes Claude fails to connect because it cannot locate the uv executable. To fix this:
-
Run
which uvin your terminal to get the absolute path to UV (e.g.,/usr/local/bin/uv). -
Open Claude Desktop’s Developer Settings -> Edit Config (
claude_desktop_config.json). -
Replace the generic
"uv"command with the absolute path you just copied. Restart Claude.
Module 4: The Core Project – The Expense Tracker
The goal is to move away from clunky form-based expense apps and use natural language (e.g., “I spent ₹500 on a cab yesterday”) to manage finances. We will use an intermediate approach utilizing a local SQLite Database (expenses.db) to store our data.
The server requires three primary capabilities, broken down into MCP Tools:
Feature 1: Adding & Listing Expenses
-
Initialization: We create a function to execute a SQL query that creates an
expensestable if it doesn’t exist, containing columns forid,date,amount,category,sub_category, andnote. -
Add Expense Tool: A tool that accepts these parameters and executes a SQL
INSERTstatement to save the transaction to the database. It is crucial to add a docstring/description to the tool so Claude knows exactly what it does. -
List Expense Tool: A tool that connects to the database, executes a
SELECT *query, and returns all records in ascending order.
Feature 2: Date Filtering & Summarization
Returning all expenses at once is inefficient.
-
Filtering: We upgrade the list tool by adding
start_dateandend_dateparameters, altering our SQL query to use aWHERE date BETWEEN ? AND ?clause. When asked “Show me September’s expenses”, Claude intelligently deduces the exact start and end dates automatically. -
Summarization Tool: We add a new tool called
summarize_expenses. This tool accepts a date range and an optionalcategory. It uses SQLGROUP BY categoryandSUM(amount)to answer questions like, “How much did I spend on education in the last 10 days?”.
Module 5: Advanced Architecture – Using “Resources” to Enforce Schema
The Problem: If you tell Claude, “I bought a Udemy course”, Claude might label the category as “Education” today, but “Up-skilling” tomorrow. This creates messy, inconsistent database entries that ruin data analysis.
The Solution: We must force Claude to choose from a strict list of allowed categories. We do this by implementing an MCP Resource.
-
Create a standard
categories.jsonfile in your project containing your strict hierarchy of categories and sub-categories. -
Expose this file to Claude using the
@fastmcp.resource()decorator.
Now, when you add an expense, you can instruct Claude to “fetch category from the resource”. Claude will read the JSON file and perfectly align your natural language input with your strict database schema (e.g., mapping a “cab ride” specifically to the “Transportation” category).
Module 6: The “Aha!” Business Value – FastAPI Integration
The ultimate power of FastMCP lies in its shared design philosophy with FastAPI.
Imagine a company like “CampusX” that already has a production-ready Expense Tracker backend built in FastAPI. This backend currently powers their website, Android app, and iOS app via REST endpoints (like /expenses and /get_expense_summary).
If they want to make their app accessible as an AI agent via Claude or ChatGPT, they do not need to rewrite their entire codebase into an MCP Server. FastMCP offers a one-line conversion feature.
1. Build a Remote MCP Server
mkdir expense-tracker-remote-mcp-server
cd expense-tracker-remote-mcp-server
uv init .
Install dependencies:
pip install fastmcp
# or
uv add fastmcp
categories.json
{
    "food": [
        "groceries",
        "fruits_vegetables",
        "dairy_bakery",
        "dining_out",
        "coffee_tea",
        "snacks",
        "delivery_fees",
        "other"
    ],
    "transport": [
        "fuel",
        "public_transport",
        "cab_ride_hailing",
        "parking",
        "tolls",
        "vehicle_service",
        "other"
    ],
    "housing": [
        "rent",
        "maintenance_hoa",
        "property_tax",
        "repairs_service",
        "cleaning",
        "furnishing",
        "other"
    ],
    "utilities": [
        "electricity",
        "water",
        "gas",
        "internet_broadband",
        "mobile_phone",
        "tv_dth",
        "other"
    ],
    "health": [
        "medicines",
        "doctor_consultation",
        "diagnostics_labs",
        "insurance_health",
        "fitness_gym",
        "other"
    ],
    "education": [
        "books",
        "courses",
        "online_subscriptions",
        "exam_fees",
        "workshops",
        "other"
    ],
    "family_kids": [
        "school_fees",
        "daycare",
        "toys_games",
        "clothes",
        "events_birthdays",
        "other"
    ],
    "entertainment": [
        "movies_events",
        "streaming_subscriptions",
        "games_apps",
        "outing",
        "other"
    ],
    "shopping": [
        "clothing",
        "footwear",
        "accessories",
        "electronics_gadgets",
        "appliances",
        "home_decor",
        "other"
    ],
    "subscriptions": [
        "saas_tools",
        "cloud_ai",
        "newsletters",
        "music_video",
        "storage_backup",
        "other"
    ],
    "personal_care": [
        "salon_spa",
        "grooming",
        "cosmetics",
        "hygiene",
        "other"
    ],
    "gifts_donations": [
        "gifts_personal",
        "charity_donation",
        "festivals",
        "other"
    ],
    "finance_fees": [
        "bank_charges",
        "late_fees",
        "interest",
        "brokerage",
        "other"
    ],
    "business": [
        "software_tools",
        "hosting_domains",
        "marketing_ads",
        "contractor_payments",
        "travel_business",
        "office_supplies",
        "other"
    ],
    "travel": [
        "flights",
        "hotels",
        "train_bus",
        "visa_passport",
        "local_transport",
        "food_travel",
        "other"
    ],
    "home": [
        "household_supplies",
        "cleaning_supplies",
        "kitchenware",
        "small_repairs",
        "pest_control",
        "other"
    ],
    "pet": [
        "food",
        "vet",
        "grooming",
        "supplies",
        "other"
    ],
    "taxes": [
        "income_tax",
        "gst",
        "professional_tax",
        "filing_fees",
        "other"
    ],
    "investments": [
        "mutual_funds",
        "stocks",
        "fd_rd",
        "gold",
        "crypto",
        "brokerage_fees",
        "other"
    ],
    "misc": [
        "uncategorized",
        "rounding",
        "other"
    ]
}
main.py
from fastmcp import FastMCP
import os
import sqlite3

DB_PATH = os.path.join(os.path.dirname(__file__), "expenses.db")
CATEGORIES_PATH = os.path.join(os.path.dirname(__file__), "categories.json")

mcp = FastMCP("ExpenseTracker")

def init_db():
    with sqlite3.connect(DB_PATH) as c:
        c.execute("""
            CREATE TABLE IF NOT EXISTS expenses(
                id INTEGER PRIMARY KEY AUTOINCREMENT,
                date TEXT NOT NULL,
                amount REAL NOT NULL,
                category TEXT NOT NULL,
                subcategory TEXT DEFAULT '',
                note TEXT DEFAULT ''
            )
        """)

init_db()

@mcp.tool()
def add_expense(date, amount, category, subcategory="", note=""):
    '''Add a new expense entry to the database.'''
    with sqlite3.connect(DB_PATH) as c:
        cur = c.execute(
            "INSERT INTO expenses(date, amount, category, subcategory, note) VALUES (?,?,?,?,?)",
            (date, amount, category, subcategory, note)
        )
        return {"status": "ok", "id": cur.lastrowid}

@mcp.tool()
def list_expenses(start_date, end_date):
    '''List expense entries within an inclusive date range.'''
    with sqlite3.connect(DB_PATH) as c:
        cur = c.execute(
            """
            SELECT id, date, amount, category, subcategory, note
            FROM expenses
            WHERE date BETWEEN ? AND ?
            ORDER BY id ASC
            """,
            (start_date, end_date)
        )
        cols = [d[0] for d in cur.description]
        return [dict(zip(cols, r)) for r in cur.fetchall()]

@mcp.tool()
def summarize(start_date, end_date, category=None):
    '''Summarize expenses by category within an inclusive date range.'''
    with sqlite3.connect(DB_PATH) as c:
        query = (
            """
            SELECT category, SUM(amount) AS total_amount
            FROM expenses
            WHERE date BETWEEN ? AND ?
            """
        )
        params = [start_date, end_date]

        if category:
            query += " AND category = ?"
            params.append(category)

        query += " GROUP BY category ORDER BY category ASC"

        cur = c.execute(query, params)
        cols = [d[0] for d in cur.description]
        return [dict(zip(cols, r)) for r in cur.fetchall()]

@mcp.resource("expense://categories", mime_type="application/json")
def categories():
    # Read fresh each time so you can edit the file without restarting
    with open(CATEGORIES_PATH, "r", encoding="utf-8") as f:
        return f.read()

# Start the server
if __name__ == "__main__":
    mcp.run(transport="http", host="0.0.0.0", port=8000)
▶️ Running the Server
You can run the MCP server in multiple ways:
Option 1: Direct Python
uv run main.py
Option 2: FastMCP Run (Recommended for Remote Server)
uv run fastmcp run main.py \
  --transport http \
  --host 0.0.0.0 \
  --port 8000 \
  --reload
🔍 Running MCP Inspector (UI)
Run inspector in a separate terminal:
uv run fastmcp dev inspector main.py --reload
Then open:
http://localhost:6274
Use the generated token if required.
🧪 Testing the Server
⚠️ Important
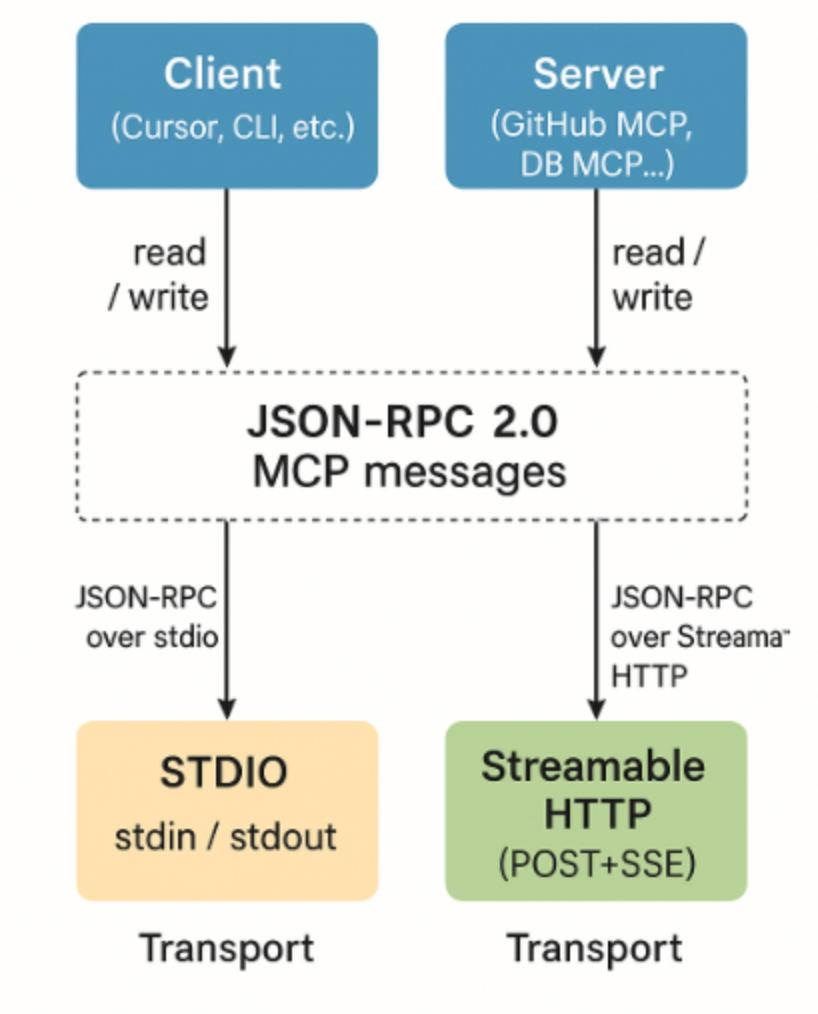
The /mcp endpoint is not a REST API. It uses:
- JSON-RPC
- Server-Sent Events (SSE)
- Session-based communication
Opening it in a browser will result in errors like:
Not Acceptable: Client must accept text/event-stream
🟢 Option 1: MCP Inspector (Recommended)
Start inspector:
uv run fastmcp dev inspector main.py --reload
Open:
http://localhost:6274
Connect to:
http://localhost:8000/mcp
👉 You can now interact with tools visually.
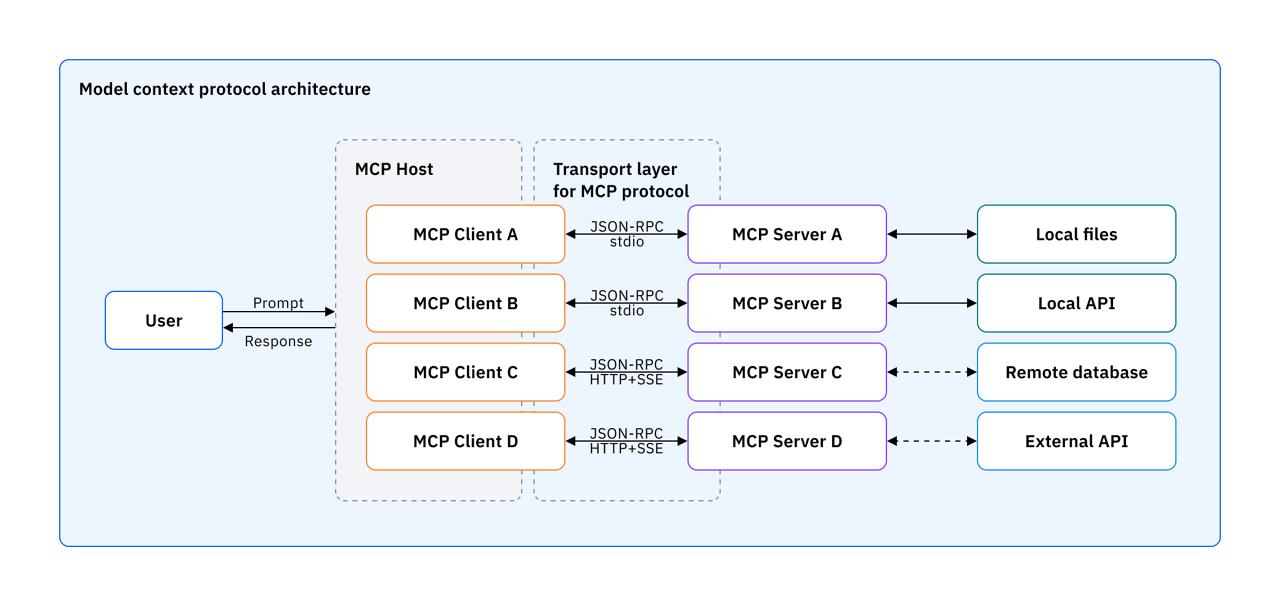
🧠 How Everything Works Behind the Scenes
MCP Flow
   [ User / Claude Desktop ]
            |
            v
   (JSON-RPC Request)
            |
            v
   [ MCP Protocol Layer ]
            |
            v
   [ FastMCP Server ]
        |       |
        |       |
        v       v
   [ Tools ]  [ Resources ]
      |            |
      v            v
  [ SQLite DB ]  [ categories.json ]
      |
      v
  (Structured Response)
      |
      v
  [ Client / UI / Inspector ]
🔵 Option 2: curl (Manual MCP Flow)
Step 1: Initialize session
curl -i \
  -H "Accept: application/json, text/event-stream" \
  -H "Content-Type: application/json" \
  -X POST http://localhost:8000/mcp \
  -d '{
    "jsonrpc": "2.0",
    "id": 1,
    "method": "initialize",
    "params": {
      "protocolVersion": "2024-11-05",
      "capabilities": {},
      "clientInfo": {
        "name": "curl-client",
        "version": "1.0"
      }
    }
  }'
👉 Copy the mcp-session-id from response headers.
Step 2: Call a tool
curl -N \
  -H "Accept: application/json, text/event-stream" \
  -H "Content-Type: application/json" \
  -H "mcp-session-id: YOUR_SESSION_ID" \
  -X POST http://localhost:8000/mcp \
  -d '{
    "jsonrpc": "2.0",
    "id": 2,
    "method": "tools/call",
    "params": {
      "name": "add_expense",
      "arguments": {
        "date": "2026-04-15",
        "amount": 500,
        "category": "food",
        "note": "lunch"
      }
    }
  }'
🧠 Understanding MCP Response
Example response:
event: message
data: { ... }
Key fields:
content→ Human-readable output (for LLMs)structuredContent→ Machine-readable output
🔍 Verify Database Entry
sqlite3 expenses.db "SELECT * FROM expenses;"
🌐 Using as Remote MCP Server
This server can be used with MCP-compatible clients like:
- Claude Desktop
- Cursor
- Custom MCP clients
Example configuration:
{
  "mcpServers": {
    "expense-tracker": {
      "url": "http://localhost:8000/mcp"
    }
  }
}
🗄️ Database
- Uses SQLite
- Auto-creates
expenses.db - No external DB required
🛠️ Development Tips
- Modify
categories.jsonwithout restarting server - Use
--reloadfor auto-restart - Change port if 8000 is occupied